Cash price and card price to a WooCommerce product
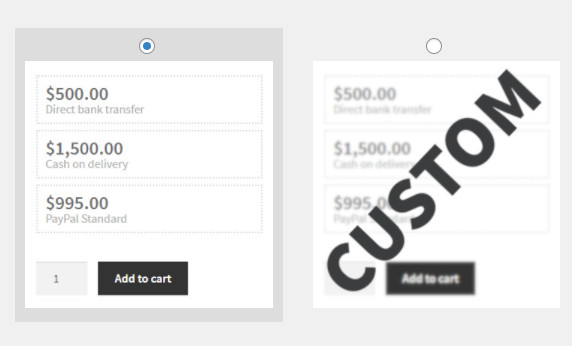
We will add 2 different prices to a product in WooCommerce, the first is for customers who want to pay in cash and the second, for those who prefer to pay with a card (Stripe ). Here is the image of how the view of the product will be.

For this we will use the WooCommerce Dynamic Pricing per Gateway plugin, which allows us, through rules, to assign multiple prices according to the payment gateway. Let’s do it!
Rules
Before establishing the rules, we must know what initial price we are going to put on our products, in my case we are going to put the price in cash and that the plugin is in charge of adding a percentage (10%) for the card price.
These are the rules that we are going to use. Remember to set a default method in case the customer is new to your store and hasn’t chosen a gateway yet.
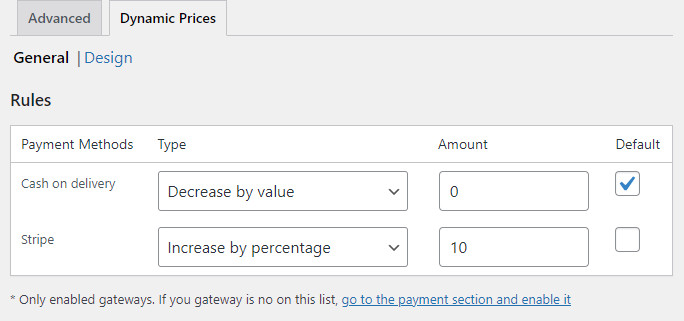
As the product will already have the price in cash initially, then the “cash on delivery” method I leave it empty and since the card payment will have an increase of 10% then I fill in the other fields as in the photo.
Design
We are going to build our own design but we are going to start with a blank one, so we are going to choose the penultimate option, the one next to the «custom». Remember that if you choose the “custom” option, no CSS will be loaded and you will have to build the layout from scratch.
After choosing the blank option, we are going to modify the template that is below, since we are going to put our own icons and we will modify, a little, the design.
<div class="wc_dynprice container">
  <div class="box" style="text-align: center; border:none;">
    <div class="price_html">[cod_price]</div>
    <div class="label_html">
      <img src="https://blog.letsgodev.com/wp-content/uploads/2021/09/icon-cash.jpg" title="icon cash" style="margin:auto;" />
    </div>
    <hr />
  </div>
  <div class="box" style="text-align: center; border:none;">
    <div class="price_html">[stripe_price]</div>
    <div class="label_html">
      <img src="https://blog.letsgodev.com/wp-content/uploads/2021/09/icon-card.jpg" title="icon card" style="margin:auto;" />
    </div>
  </div>
</div>
Below the designs there is an HTML editor, that is where you must copy and paste this code.
Create a product
As the last step, we are going to create a product and for this, we must enable the use of dynamic prices and prices generated by obeying the rules already established will appear. Here is an image of what is described:
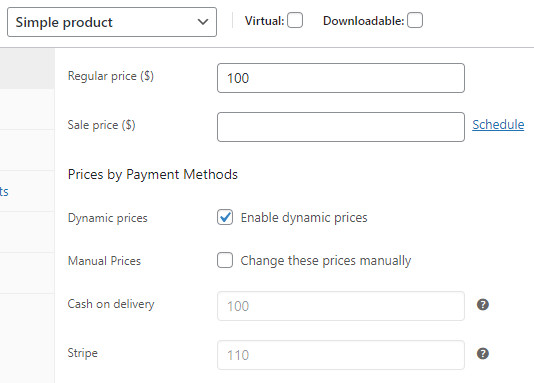
The price of the product is 100 and as in the rules we established that the card price is an additional 10%, then the plugin sets the Stripe price at 110. If we want to ignore the established rules and set our prices manually, we only enable that option and we can edit the price.
Ready! you can already see the product.
Another design – Description of the payment method
Here is another design in which there are no icons but there is a description of the payment method

And here is the HTML template to generate it:
<div class="wc_dynprice container">
  <div class="box" style="text-align: center; border:none; margin:0; padding:0;">
    <div class="price_html">[cod_price]</div>
    <div class="label_html">
      Cash, Transfer
    </div>
    <hr style="margin: 15px 0 0 0;" />
  </div>
  <div class="box" style="text-align: center; border:none; margin:0;">
    <div class="price_html">[stripe_price]</div>
    <div class="label_html">
      Credit Card
    </div>
  </div>
</div>
If you have knowledge of CSS, we suggest you choose the “custom” option and create your own designs. Any questions, in the comments.