
How to design the WooCommerce checkout form
The checkout form is one of the most important elements of any WooCommerce store. Customizing its design can significantly improve the user experience and conversion rates. In this article, you’ll learn how to modify the layout of checkout fields using specific CSS classes, reorder fields using the priorityattribute, and apply these changes correctly using the appropriate hooks.
CSS classes for checkout layout
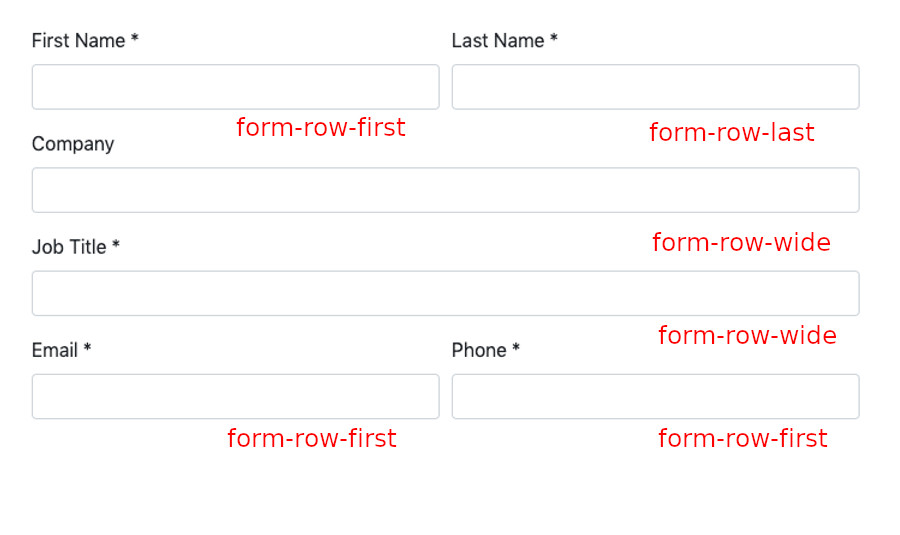
WooCommerce uses CSS classes that you can apply to checkout fields to organize them into rows and columns. The most common classes are:
| Clase CSS | Descripción |
|---|---|
form-row-first |
Aligns the field to the beginning of the row (usually to the left). |
form-row-last |
Aligns the field to the end of the row (usually to the right). |
form-row-wide |
Makes the field span 100% of the available width (full row) |
These classes are applied using the classattribute inside the field definition.
How to apply these classes using woocommerce_checkout_fields
To modify the checkout fields, you can use the woocommerce_checkout_fields hook. It allows you to customize fields like first name, email, phone, etc. Here’s an example of how to apply custom CSS classes and change the field order:
<?php
add_filter( 'woocommerce_checkout_fields', 'customizeCheckoutFields' );

function customizeCheckoutFields( $fields ) {
    // First and last name on the same row
    $fields['billing']['billing_first_name']['class'] = [ 'form-row-first' ];
    $fields['billing']['billing_last_name']['class']  = [ 'form-row-last' ];

    // Email below, taking full width
    $fields['billing']['billing_email']['class']      = [ 'form-row-wide' ];

    // Phone before email
    $fields['billing']['billing_phone']['priority']   = 15;
    $fields['billing']['billing_email']['priority']   = 20;

    return $fields;
}
- The
billingarray contains all billing-related fields. classis used to apply CSS styling.prioritydefines the display order (lower number = shown earlier).
What about address fields?
WooCommerce handles address fields (like country, state, city, and address) a bit differently. These fields cannot be fully customized using woocommerce_checkout_fields. Instead, you must use the woocommerce_default_address_fieldshook.
<?php
add_filter( 'woocommerce_default_address_fields', 'customizeDefaultAddressFields' );

function customizeDefaultAddressFields( $fields ) {
    // Country and state on the same row
    $fields['country']['class'] = [ 'form-row-first' ];
    $fields['state']['class']   = [ 'form-row-last' ];

    // Address takes a full row
    $fields['address_1']['class'] = [ 'form-row-wide' ];

    // City shown after address
    $fields['city']['priority'] = 95;

    return $fields;
}
Redesigning the WooCommerce checkout form is completely possible with just a bit of code and a good understanding of how hooks and CSS classes work. Remember to use woocommerce_checkout_fieldsfor general checkout fields, and woocommerce_default_address_fieldsfor address-specific fields. By combining both approaches, you can offer a much cleaner and more professional checkout experience.